สารบัญเนื้อหา
- การสร้าง Reactive Forms ใน Angular
- การสร้าง Validation ด้วย Reactive Forms ใน Angular
- Custom Validators ใน Angular
- การสร้าง Validation Feedback
- ใช้งาน Reactive Forms โดยใช้ FormBuilder Service
- เพิ่มการรับข้อมูลใน Registration Form
- การจัดการเกี่ยวกับ Date ใน Forms
- Implement Registration Form
1. การสร้าง Reactive Forms ใน Angular
import ReactiveFormsModule จาก @angular/forms ใน app.module.ts
เพิ่ม var registerForm: FormGroup; ใน register.component.ts
registerForm: FormGroup;เพิ่มการ initial ค่าที่ onInit() ของ register.component.ts
ngOnInit() {
  this.registerForm = new FormGroup({
    username: new FormControl(),
    password: new FormControl(),
    confirmPassword: new FormControl()
  });
}
comment register() และกำหนดให้แสดงข้อมูลใน console เมื่อกด register
register() {
  // this.authService.register(this.model).subscribe(() => {
  //   this.alertify.success('registration successfully');
  // }, error => {
  //   this.alertify.error(error);
  // });
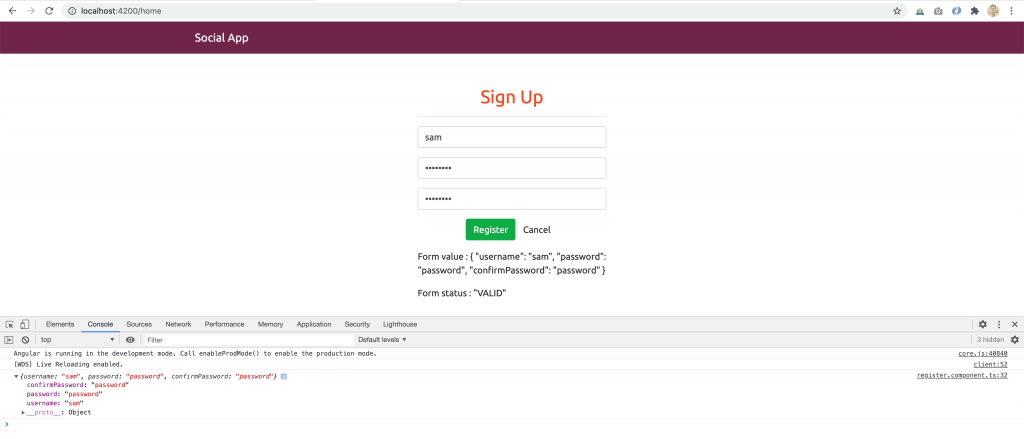
  console.log(this.registerForm.value);
}
ปรับเปลี่ยน html form ใน register.component.html
<form [formGroup]="registerForm" (ngSubmit)="register()">
  <h2 class="text-center text-primary mt-2">Sign Up</h2>
  <hr>

  <div class="form-group">
    <input type="text" class="form-control" formControlName="username" placeholder="Username">
  </div>

  <div class="form-group">
    <input type="password" class="form-control" formControlName="password" placeholder="Password">
  </div>

  <div class="form-group">
    <input type="password" class="form-control" formControlName="confirmPassword" placeholder="Confirm Password">
  </div>

  <div class="form-group text-center">
    <button class="btn btn-success" type="submit">Register</button>
    <button class="btn btn-default" type="button" (click)="cancel()">Cancel</button>
  </div>
</form>

<p>Form value : {{registerForm.value | json}}</p>
<p>Form status : {{registerForm.status | json}}</p>
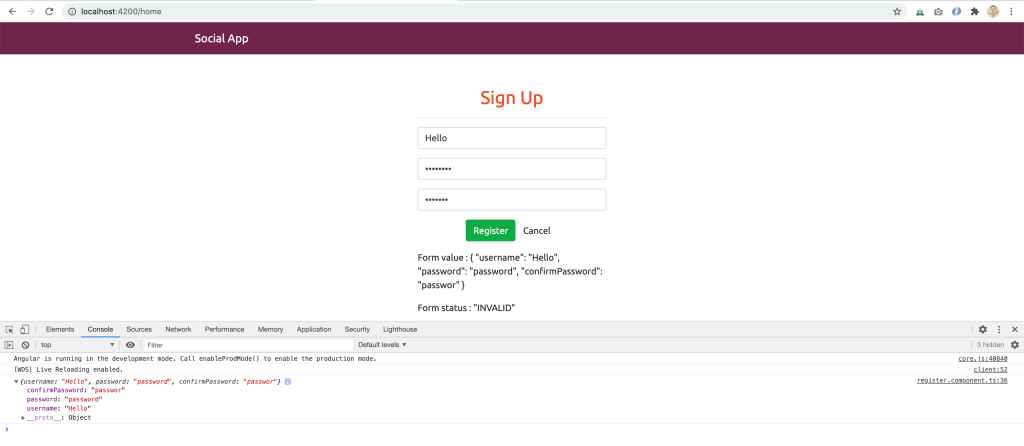
ทดสอบรัน และดูผล
2. การสร้าง Validation ด้วย Reactive Forms ใน Angular
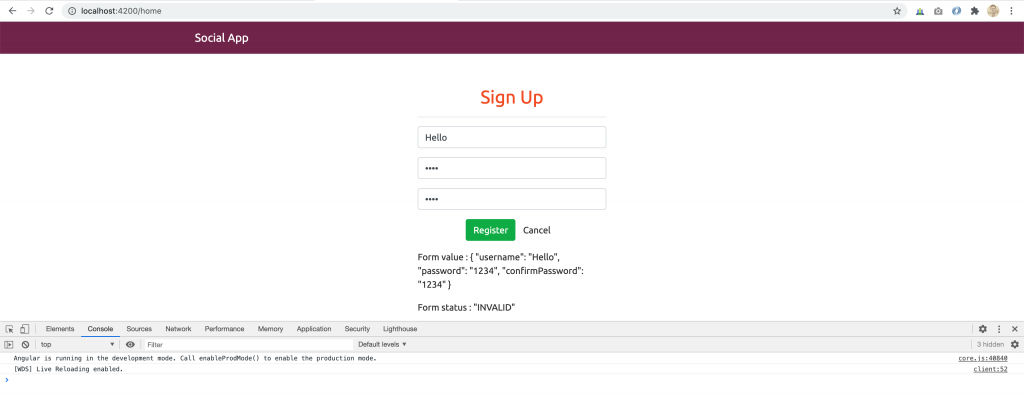
กำหนดให้มีการ Validation ใน register.component.ts
ngOnInit() {
  this.registerForm = new FormGroup({
    username: new FormControl('Hello', Validators.required),
    password: new FormControl('', [Validators.required, Validators.minLength(6), Validators.maxLength(8)]),
    confirmPassword: new FormControl('', Validators.required)
  });
}
3. Custom Validators ใน Angular
เพิ่ม Custom Validator เป็นการตรวจสอบว่า confirm password ตรงกันหรือไม่
ngOnInit() {
  this.registerForm = new FormGroup({
    username: new FormControl('Hello', Validators.required),
    password: new FormControl('', [Validators.required, Validators.minLength(6), Validators.maxLength(8)]),
    confirmPassword: new FormControl('', Validators.required)
  }, this.passwordMatchValidator);
}

passwordMatchValidator(g: FormGroup) {
  return g.get('password').value === g.get('confirmPassword').value ? null : {'mismatch': true};
}
4. การสร้าง Validation Feedback
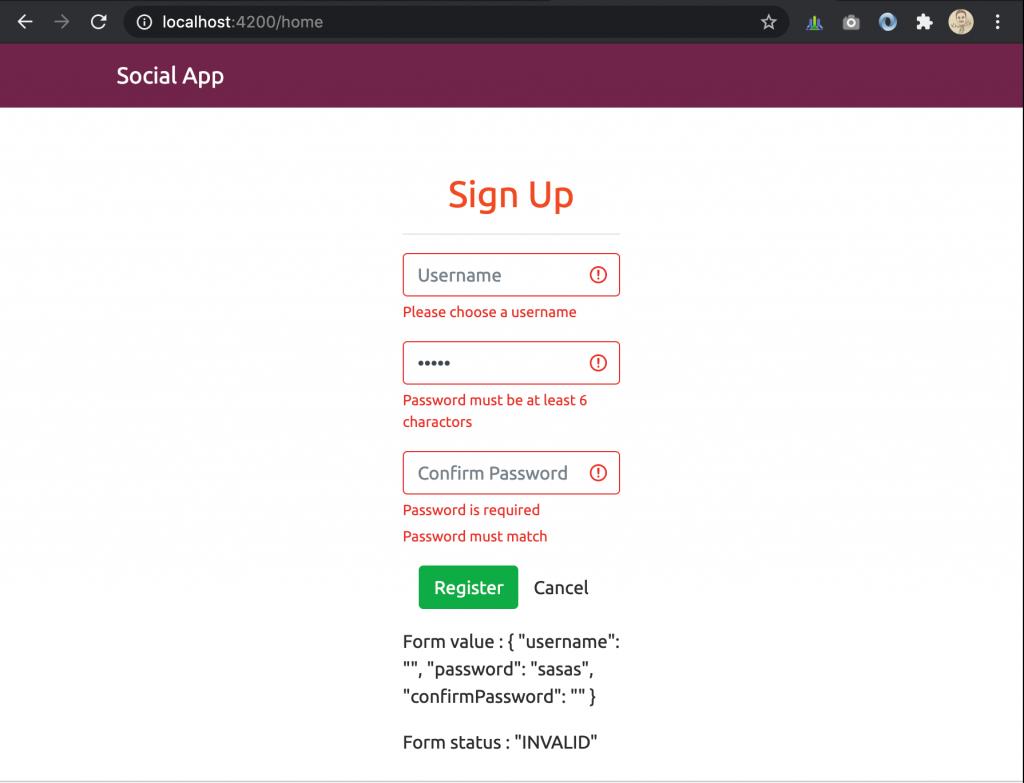
Validation Feedback เป็นการเพิ่มการแสดงข้อความ Error เมื่อ Form Invalid โดยเราจะทำการปรับปรุงไฟล์ register.component.html ดังนี้
<form [formGroup]="registerForm" (ngSubmit)="register()">
  <h2 class="text-center text-primary mt-2">Sign Up</h2>
  <hr>

  <div class="form-group">
    <input type="text"
      [ngClass]="{'is-invalid': registerForm.get('username').errors && registerForm.get('username').touched}"
      class="form-control is-invalid"
      formControlName="username"
      placeholder="Username">
    <div class="invalid-feedback">Please choose a username</div>
  </div>

  <div class="form-group">
    <input type="password"
      [ngClass]="{'is-invalid': registerForm.get('password').errors && registerForm.get('password').touched}"
      class="form-control"
      formControlName="password"
      placeholder="Password">
    <div class="invalid-feedback" *ngIf="registerForm.get('password').hasError('required') && registerForm.get('password').touched">Password is required</div>
    <div class="invalid-feedback" *ngIf="registerForm.get('password').hasError('minlength') && registerForm.get('password').touched">Password must be at least 6 charactors</div>
    <div class="invalid-feedback" *ngIf="registerForm.get('password').hasError('maxlength') && registerForm.get('password').touched">Password cannot exeed 8 charactors</div>
  </div>

  <div class="form-group">
    <input type="password"
      [ngClass]="{'is-invalid': registerForm.get('confirmPassword').errors && registerForm.get('confirmPassword').touched || registerForm.get('confirmPassword').touched && registerForm.hasError('mismatch')}"
      class="form-control"
      formControlName="confirmPassword"
      placeholder="Confirm Password">
      <div class="invalid-feedback" *ngIf="registerForm.get('confirmPassword').hasError('required') && registerForm.get('confirmPassword').touched">Password is required</div>
      <div class="invalid-feedback" *ngIf="registerForm.hasError('mismatch') && registerForm.get('confirmPassword').touched">Password must match</div>
  </div>

  <div class="form-group text-center">
    <button class="btn btn-success" type="submit">Register</button>
    <button class="btn btn-default" type="button" (click)="cancel()">Cancel</button>
  </div>
</form>

<p>Form value : {{registerForm.value | json}}</p>
<p>Form status : {{registerForm.status | json}}</p>
เมื่อ Form อยู่ในสถานะ Invalid และเราได้แตะตัว input แล้ว จะมีข้อความแสดงการ Validation ออกมา
5. ใช้งาน Reactive Forms โดยใช้ FormBuilder Service
เปลี่ยนการสร้างฟอร์ม โดยเราจะสร้างฟอร์มโดยใช้ FormBuilder จะได้ชัดเจน และสะดวกขึ้น จากเดิม
ngOnInit() {
  this.registerForm = new FormGroup({
    username: new FormControl('', Validators.required),
    password: new FormControl('', [Validators.required, Validators.minLength(6), Validators.maxLength(8)]),
    confirmPassword: new FormControl('', Validators.required)
  }, this.passwordMatchValidator);
}
เป็น (เพิ่ม constructors ด้วยนะ)
private fb: FormBuilderngOnInit() {
this.createRegisterForm();
}
createRegisterForm() {
this.registerForm = this.fb.group({
username: ['', Validators.required],
password: ['', [Validators.required, Validators.minLength(6), Validators.maxLength(8)]],
confirmPassword: ['', Validators.required]
}, {validator: this.passwordMatchValidator});
}
passwordMatchValidator(g: FormGroup) {
return g.get('password').value === g.get('confirmPassword').value ? null : {'mismatch': true};
}ลองทดสอบดูฟอร์มต้องยังคงทำงานได้เหมือนเดิม แต่การสร้างฟอร์มจะมีรูปแบบที่ดีมากขึ้น
6. เพิ่มการรับข้อมูลใน Registration Form
เพิ่มข้อมูลที่ต้องกรอกใน RegisterFrom
createRegisterForm() {
  this.registerForm = this.fb.group({
    gender: ['male'],
    username: ['', Validators.required],
    knownAs: ['', Validators.required],
    dateOfBirth: ['', Validators.required],
    city: [null, Validators.required],
    country: ['', Validators.required],
    password: ['', [Validators.required, Validators.minLength(6), Validators.maxLength(8)]],
    confirmPassword: ['', Validators.required]
  }, {validator: this.passwordMatchValidator});
}
ปรับปรุง register.component.html
<form [formGroup]="registerForm" (ngSubmit)="register()">
  <h2 class="text-center text-primary mt-2">Sign Up</h2>
  <hr>

  <div class="form-group">
    <label class="control-label" style="margin-right:10px">I am a: </label>
    <label class="radio-inline">
      <input class="mr-3" type="radio" value="male" formControlName="gender">Male
    </label>
    <label class="radio-inline ml-3">
      <input class="mr-3" type="radio" value="female" formControlName="gender">Female
    </label>
  </div>

  <div class="form-group">
    <input type="text"
      [ngClass]="{'is-invalid': registerForm.get('username').errors && registerForm.get('username').touched}"
      class="form-control is-invalid"
      formControlName="username"
      placeholder="Username">
    <div class="invalid-feedback">Please choose a username</div>
  </div>

  <div class="form-group">
    <input [ngClass]="{'is-invalid': registerForm.get('knownAs').errors && registerForm.get('knownAs').touched}" class="form-control"
      placeholder="Known as" formControlName="knownAs">
    <div class="invalid-feedback" *ngIf="registerForm.get('knownAs').touched && registerForm.get('knownAs').hasError('required')">Known as is required</div>
  </div>

  <div class="form-group">
    <input [ngClass]="{'is-invalid': registerForm.get('dateOfBirth').errors && registerForm.get('dateOfBirth').touched}" class="form-control"
      placeholder="Date of Birth" formControlName="dateOfBirth" type="date" >
    <div class="invalid-feedback" *ngIf="registerForm.get('dateOfBirth').touched && registerForm.get('dateOfBirth').hasError('required')">Date of Birth is required</div>
  </div>

  <div class="form-group">
    <input [ngClass]="{'is-invalid': registerForm.get('city').errors && registerForm.get('city').touched}" class="form-control"
      placeholder="City" formControlName="city">
    <div class="invalid-feedback" *ngIf="registerForm.get('city').touched && registerForm.get('city').hasError('required')">City is required</div>
  </div>

  <div class="form-group">
    <input [ngClass]="{'is-invalid': registerForm.get('country').errors && registerForm.get('country').touched}" class="form-control"
      placeholder="Country" formControlName="country">
    <div class="invalid-feedback" *ngIf="registerForm.get('country').touched && registerForm.get('country').hasError('required')">Country is required</div>
  </div>

  <div class="form-group">
    <input type="password"
      [ngClass]="{'is-invalid': registerForm.get('password').errors && registerForm.get('password').touched}"
      class="form-control"
      formControlName="password"
      placeholder="Password">
    <div class="invalid-feedback" *ngIf="registerForm.get('password').hasError('required') && registerForm.get('password').touched">Password is required</div>
    <div class="invalid-feedback" *ngIf="registerForm.get('password').hasError('minlength') && registerForm.get('password').touched">Password must be at least 6 charactors</div>
    <div class="invalid-feedback" *ngIf="registerForm.get('password').hasError('maxlength') && registerForm.get('password').touched">Password cannot exeed 8 charactors</div>
  </div>

  <div class="form-group">
    <input type="password"
      [ngClass]="{'is-invalid': registerForm.get('confirmPassword').errors && registerForm.get('confirmPassword').touched || registerForm.get('confirmPassword').touched && registerForm.hasError('mismatch')}"
      class="form-control"
      formControlName="confirmPassword"
      placeholder="Confirm Password">
      <div class="invalid-feedback" *ngIf="registerForm.get('confirmPassword').hasError('required') && registerForm.get('confirmPassword').touched">Password is required</div>
      <div class="invalid-feedback" *ngIf="registerForm.hasError('mismatch') && registerForm.get('confirmPassword').touched">Password must match</div>
  </div>

  <div class="form-group text-center">
    <button class="btn btn-success" [disabled]="!registerForm.valid" type="submit">Register</button>
    <button class="btn btn-default" type="button" (click)="cancel()">Cancel</button>
  </div>
</form>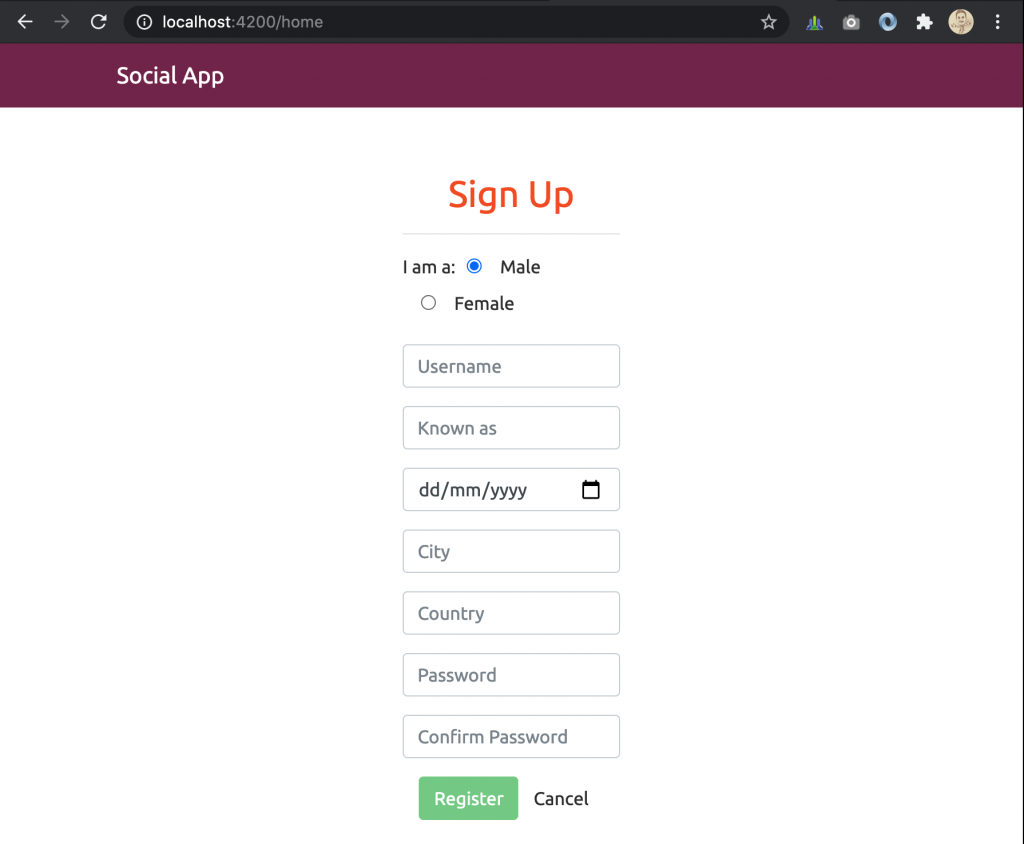
7. การจัดการเกี่ยวกับ Date ใน Forms
เนื่องจากการ input date แบบเดิม ๆ มันธรรมดาไป เราก็เลยต้องการใช้ Datte Picker สวย ๆ แทน โดยเราจะใช้ Date Picker ที่อยู่ใน ngx-bootstrap
ทำการ import
BsDatepickerModule.forRoot()จาก
import { BsDatepickerModule } from 'ngx-bootstrap/datepicker';import
BrowserAnimationsModuleจาก
import { BrowserAnimationsModule } from '@angular/platform-browser/animations';import css ใน styles.css
@import "../node_modules/ngx-bootstrap/datepicker/bs-datepicker.css";เพิ่ม var ใน register.component.ts
bsConfig: Partial<BsDatepickerConfig>;กำหนดค่า theme ของ date picker ใน onInit
this.bsConfig = {
  containerClass: 'theme-red'
};
เปลี่ยน input date ใน register.component.html
<input [ngClass]="{'is-invalid': registerForm.get('dateOfBirth').errors && registerForm.get('dateOfBirth').touched}" class="form-control"
      placeholder="Date of Birth" formControlName="dateOfBirth" type="text" bsDatepicker [bsConfig]="bsConfig" >
8. Implement Registration Form
ปรับปรุง API สำหรับการลงทะเบียนให้สามารถรับข้อมูลได้มากขึ้น
UserForRegisterDto.cs
using System;
using System.ComponentModel.DataAnnotations;

namespace SocialApp_API.Dtos
{
    public class UserForRegisterDto
    {
        [Required]
        public string Username { get; set; }
        [Required]
        [StringLength(8, MinimumLength = 4,ErrorMessage = "You must specify password between 4 and 8 charectors")]
        public string Password { get; set; }
        [Required]
        public string Gender { get; set; }
        [Required]
        public string KnownAs { get; set; }
        [Required]
        public DateTime DateOfBirth { get; set; }
        [Required]
        public string City { get; set; }
        [Required]
        public string Country { get; set; }
        public DateTime Created { get; set; }
        public DateTime LastActive { get; set; }
        public UserForRegisterDto()
        {
            Created = DateTime.Now;
            LastActive = DateTime.Now;
        }
    }
}
เพิ่ม AutoMapperProfiles.cs
CreateMap<UserForRegisterDto, User>();เพิ่ม Name ใน Method GetUser() ใน Users.Controller.cs
[HttpGet("{id}", Name = "GetUser")]ปรับปรุง Register() ใน AuthController.cs
[HttpPost("register")]
public async Task<IActionResult> Register(UserForRegisterDto userForRegisterDto)
{
    userForRegisterDto.Username = userForRegisterDto.Username.ToLower();

    if (await _repo.UserExist(userForRegisterDto.Username))
        return BadRequest("Username already exists");

    var userToCreate = _mapper.Map<User>(userForRegisterDto);

    var createdUser = await _repo.Register(userToCreate, userForRegisterDto.Password);

    var userToReturn = _mapper.Map<UserForDetailedDto>(createdUser);

    return CreatedAtRoute("GetUser", new {Controller = "User",
        id = createdUser.Id }, userToReturn);
}
ลองเรียกใช้ API ผ่าน Postman
ทำการ implement register form ใน register.component.ts
กำหนดตัวแปร
user: User;เพิ่ม constructor
private router: Routerปรับปรุงฟังก์ชัน register()
register() {
  if (this.registerForm.valid) {
    this.user = Object.assign({}, this.registerForm.value);
    this.authService.register(this.user).subscribe(() => {
      this.alertify.success('Registration successful');
    }, error => {
      this.alertify.error(error);
    }, () => {
      this.authService.login(this.user).subscribe(() => {
        this.router.navigate(['/members']);
      });
    });
  }
}
ปรับปรุง register() ใน auth.service.ts
register(user: User) {
  return this.http.post(this.baseUrl + 'register', user);
}
ลองทำการ Register จะพบว่า รูปภาพโปรไฟล์ไม่มี

มาแก้ปัญหากรณีภาพโปรไฟล์ไม่ขึ้นต่อ
member-card.component.html
<img src="{{user.photoUrl || '../../../../../assets/user.png'}}" alt="{{user.knownAs}}" class="card-img-top">ทำเช่นเดียวกันใน member-edit, member-detail และ nav
ปรับปรุง initailizeUpload() ใน photo-editor.component.ts เพื่อให้เวลา upload ภาพแรกแล้วทำให้ภาพโปรไฟล์เปลี่ยนตาม
initializeUpload() {
    this.uploader = new FileUploader({
      url: this.baseUrl + 'users/' + this.authService.decodeToken.nameid + '/photos',
      authToken: 'Bearer ' + localStorage.getItem('token'),
      isHTML5: true,
      allowedFileType: ['image'],
      removeAfterUpload: true,
      autoUpload: false,
      maxFileSize: 10 * 1024 * 1024
    });

    this.uploader.onAfterAddingFile = (file) => { file.withCredentials = false; };

    this.uploader.onSuccessItem = (item, response, status, headers) => {
      if (response) {
        const res: Photo = JSON.parse(response);
        const photo = {
          id: res.id,
          url: res.url,
          dateAdded: res.dateAdded,
          description: res.description,
          isMain: res.isMain
        };
        this.photos.push(photo);
        if (photo.isMain) {
          this.authService.changeMemberPhoto(photo.url);
          this.authService.currentUser.photoUrl = photo.url;
          localStorage.setItem('user', JSON.stringify(this.authService.currentUser));
        }
      }
    };

  }
โปรดติดตามตอนต่อไป…

